

How To Scale Up A Drawing By Hand
How to Draw Technical Flats by Hand
Did you know that before vector drawing programs similar Illustrator, fashion brands would draw their Technical Sketches by hand? It'south entirely possible to draw accurate, professional person Technical Flats without expensive software like Illustrator. While I exercise take a whole series on How to Create Your Own Technical Flats in Illustrator, I realize that not everyone has access to a computer or CAD Software. And then, I wanted to show you the skilful old fashioned way of creating Technical Flats.
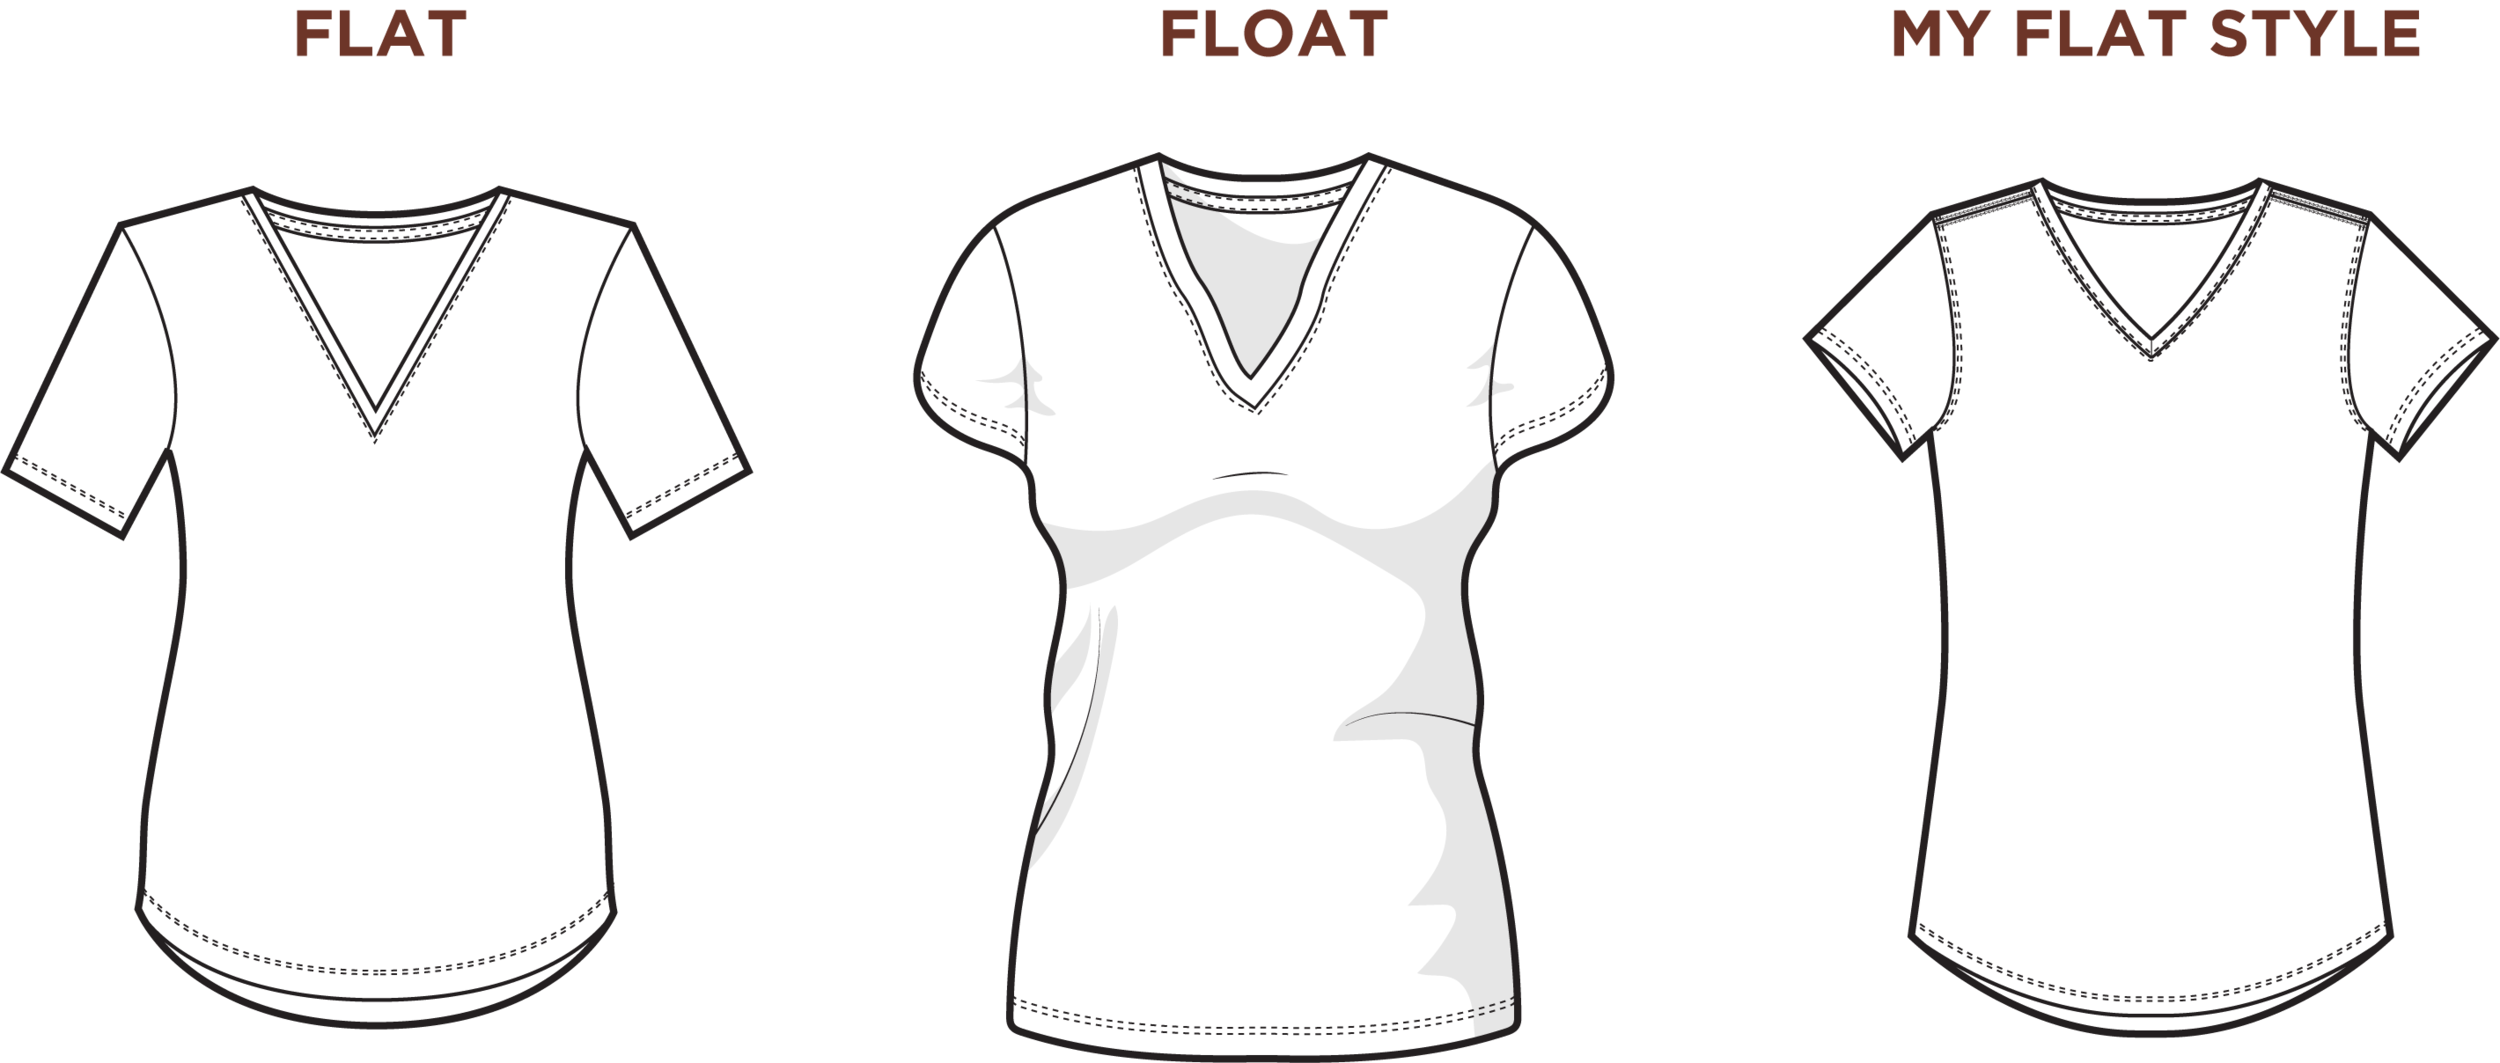
When I first learned how to describe Technical Flats it was by drawing them with a pencil on newspaper. Learning by-mitt Technical Flats really helped me to understand proportion and flat styling before diving into complicated CAD Software. In one case I became more advanced, I was able to pull from all my experience to develop my own mode. Over the years I've realized that a half float, half flat way in proportional scale works best for me, the manufactory, and my clients. So, before we bound into the tutorial let's review.
What is a Technical Apartment?
A technical sketch, which tin can also be referred to every bit a CAD, Fashion Flat, or Technical Flat, is a detailed and accurate representation of your garment. It is most often used as a part of the Tech Pack to communicate the design, structure, and stitch details of your garment to the manufacturing plant. Information technology is drawn to stand for the garment laid flat without whatsoever stylized illustrative elements. Read more nearly Technical Sketches hither.
What is a Bladder?
A float is a stylized version of a Technical Apartment. It is unremarkably created for apply in presentations to represent the silhouette and movement of a garment. It is characterized by shading, motility lines, and inaccurate "fluid" silhouettes. The intention of a float is to brand the sketch appear as if the garment is "floating" in an invisible torso.
Proportional Calibration Vs. 1/8 Scale
I choose to depict my flats in proportional scale instead of one/8 scale considering it creates more realistic flats. Drawing in one/8 calibration produces flats that are skewed in appearance (fifty-fifty though they are accurate to how the garment measures) considering y'all are taking a 3D object and making it 2D. Check out this tutorial if you want to learn more almost the divergence between proportional scale vs. i/8 scale and why you may desire to choose one over the other.

LEARN IN WHICHEVER WAY BEST SUITS YOU!
Watch the video below or scroll down to read the full postal service.
Follow me on YouTube for more educational videos!
How to Draw Flats past Hand
Without using expensive software, like Illustrator
For this tutorial nosotros will be using proportional scale (but I'll show you lot some i/8 calibration info) and a one-half bladder/half apartment advent like my signature Technical Sketches.
You will need:
-
Grid Paper (8 squares per inch) or my Technical Apartment Template
-
Pencil and Eraser
-
Fine tip mark pen
-
Ruler
-
Curve Guide (if you don't accept this I'll prove y'all some other ways you can go perfect curves with items you already accept)
-
Your garment, design idea, or image
-
Optional: Garment Measurement (specs) if cartoon in 1/8 scale
If yous need help finding any of these supplies I take them all listed correct hither on my supplies list (this is an affiliate link, larn what that means for y'all and for me ).
Before you brainstorm
On your grid paper or the grid on your Technical Flat Template each square is equal to ane" in real life. This is important to notation whether drawing in proportional or 1/eight scale considering this gives you an understanding of the general size that your flat will exist.
We volition first by drawing our Technical Apartment in pencil. When you showtime first cartoon Technical Flats it's helpful to have a full general understanding of how big your garment is. Here are a few general measurements to accept into consideration to hone in on your perfect proportions:
-
Garment length
-
Garment width (chest or hip width)
-
Sleeve length
Once you get more experience you'll be able to eyeball this pretty easily for proportional scale. If you are cartoon in 1/eight scale you volition need collect all of your measurements for your garment. And then, you will take your measurements (whether that's just the few above, or all for 1/eight scale) and multiply each of them by .125. Here'south the equation:
[Garment Measurement] x .125 = i/8 Calibration Measurement
Ex: twenty" x .125 = 2.5" (on paper)
Alternatively, y'all can likewise just eyeball it because we know that 1 foursquare = 1" – so if I accept a garment that has a 20" chest width, then you will know that the width of the cartoon (at the chest) volition be 20 squares.
stride i: Plotting main points
So, now that we have an understanding of our calibration, nosotros want to start plotting some points using the grid method or a ruler. Plotting out some general points will give us an idea of the shape of our garment.
-
Outset by marking a vertical line in the center of your paper. This line represents the heart of your garment. Nosotros will be drawing just one half of our garment get-go.
-
Take the main measurements from higher up and mark them on your paper. When marking widths, be sure to only mark half of the width yous calculated above (because nosotros are merely drawing one-half of the garment first).
Step 2: Outline the Shape
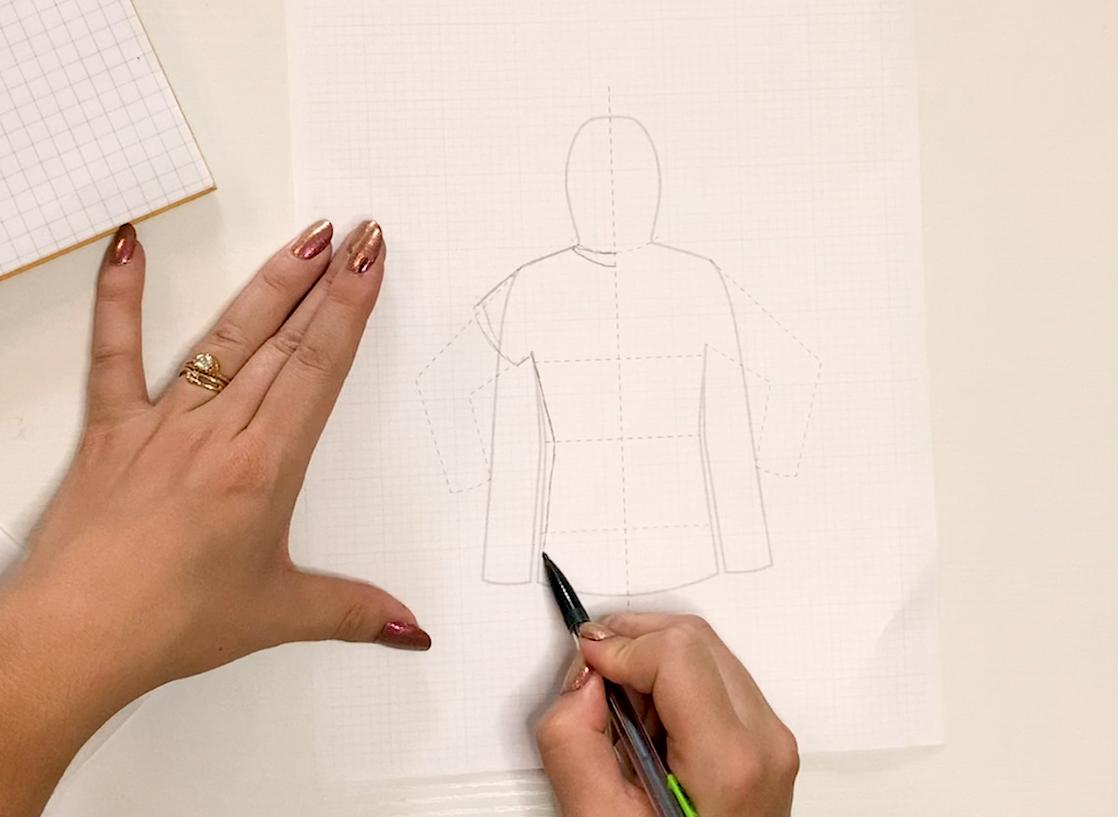
Adjacent, we can start filling in the outline of our garment's shape. Call back to keep using your pencil so that you lot can arrange and erase as necessary!
-
Follow the shape dictated by the points you plotted in Footstep 1. If using proportional scale, fill in the other details of the shape by eyeballing the overall look of the garment. If using 1/viii scale yous can simply connect the dots.
[ PRO TIP: Fifty-fifty though we are but creating half of our sketch first, I like to reverberate my outline right away so I tin can see and adjust the proportions every bit necessary. ]
-
Ever start with the outline first. Don't add things like stitching, armholes, or necklines just still. If it helps you visualize the proportion you tin definitely add together some details lightly in pencil.
Pace 3: Details
Once all of that looks proportional and good to you, then you lot tin can motility into the details.
-
Start by adding the details for the openings of the garment offset. For example, the bottom hem opening, sleeve opening, and neck opening.
-
Adjacent, y'all tin add stitching and other small details like zipper pulls and pockets.
[ PRO TIP: Apply the Curve Guide or other household objects to get the perfect bend or shape for details. In that location are so many objects around your dwelling that tin be used in place of a Curve Guide. For instance, you could use a thread spool, bobbin, or thumbtack to make a perfect circle. ]
Footstep iv: Reflecting
In one case you're happy with the overall proportion and details, then y'all tin move into reflecting your fully illustrated half into a full garment. There are several methods you lot tin can utilise for reflecting your drawing:
-
Plot the aforementioned points in reverse and draw in the details as you did for the get-go side.
-
Darken the graphite on the side you've already created. And so, fold the paper in half at your center line and rub the drawing from the back. The graphite will transfer as a reflection of your original drawing. You can then go back and clean up the lines in grooming for inking the drawing.
-
Outline your 1 one-half in dark graphite. Fold information technology in half at the center line with the drawing facing out. Place the page over a calorie-free background or light box and trace the other side.
Pace 5: Inking
Now that yous have a total sketched garment, take a moment to double check all the details. Brand any changes necessary. Once you move onto inking you lot won't exist able to brand changes, so be very thorough! If you do decide you lot need to alter something you volition either need to offset over or retrace the original. For that reason you may consider keeping the pencil draft and simply inking over the top on a clean sheet of newspaper. Using a make clean sheet of not-grid paper is ideal if using your Technical Sketches for the Tech Pack.
-
Advisedly trace the outline of your garment using a wider tip marker pen (I have a pack with dissimilar size tips that's great for this, it's linked above under the supplies). Yous can cull to go straight over the drawing you lot've already created or tracing information technology on a new slice of paper.
-
Next, go in with smaller tip markers to trace the details and add things like stitching.
-
Finally, if y'all've fatigued over the original you can erase your pencil lines.
-
All done!
As y'all can see, drawing Technical Flats by hand really isn't much different from using a CAD program like Illustrator. I would say the biggest con to drawing Flats past manus is the time investment and the inability to make changes easily in one case the drawing is inked.
So, I've created a template to brand drawing your Technical Flats much quicker. The Technical Flat Template features proportional scale silhouettes of common garments on a eight-squares-per-inch graph paper background. This template allows you to speedily run into accurate proportions then arrange for your unique design. Yous can run across from the video that this shortened my drawing fourth dimension by A LOT!
INTRODUCING
Technical Flat Templates
Features:
-
Proportional Scale based on ladies size Medium and mens size Large
-
Low opacity to easily depict over the superlative
-
Major measurement points are marked (chest, waist, hip, etc.)
-
Marked with centre line for ease of reflecting your drawing
-
Printable
-
Or tin can exist used in whatever program that accepts image (.jpg/.jpeg) files such as (but not limited to) – Illustrator, Photoshop, Procreate, and more than!
-
8 squares per inch graph paper background
Bonus: Getting your Drawing Ready for the Tech Pack
To go this drawing prepared to put in the Tech Pack or utilise information technology digitally, y'all volition need to take a photo of it or put it through a scanner. You can then put it into a photo editing software to darken upwards the lines and whiten the background. If yous don't want to see the grid paper lines y'all can either remove them in a photograph editing software or trace the drawing on to plain white newspaper.
And that'due south it! I promise that this quick tutorial showed you that drawing Technical Flats past mitt can all the same produce beautiful and accurate Technical Flats to use in your Tech Pack. AND that you don't have to spend a ton of money on expensive software to create professional Flats for your budding brand or business!
If you enjoyed this tutorial it would mean and then much to me if you would share information technology then that other designers like you can find it too. For more awesome technical and design tutorials be sure to subscribe to get notified when new tutorials come out.


Yous MAY Too LIKE:

Source: https://www.pointsofmeasure.com/tutorials-education/how-to-draw-technical-flats-by-hand
Posted by: andersonliet1959.blogspot.com
0 Response to "How To Scale Up A Drawing By Hand"
Post a Comment